Creating and Enrolling a New Student​

Modified on Wed, Mar 18 at 5:18 PM

GR LearnPro - Creating and Enrolling a New Student 

The Manage Students feature in GR LearnPro allows administrators and educators to efficiently add, manage, and enroll students.


Adding a New Student

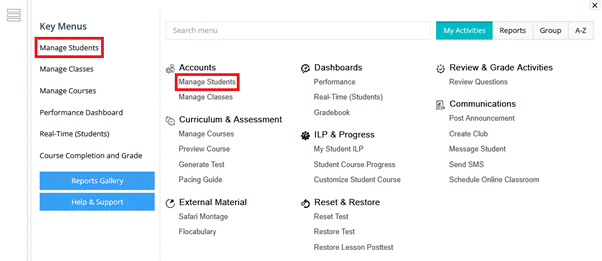
  1. Navigate to Manage Students under My Activities, or under My Accounts


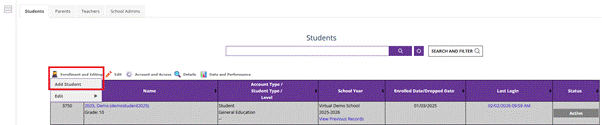
      2. Under Enrollment and Editing, click the “Add Student” button.


       3. A page is displayed to fill the basic information:


a. Login Information


  • First Name
  • Middle Name (optional)
  • Last Name
  • Student ID/Number
  • Username
  • Password
  • Confirm Password
  • Clever ID (if applicable)
  • SSID ID (if applicable)


b. Academic Details


  • Select School
  • School Year
  • Grade Level
  • Graduation Requirement (if applicable)
  • Role (Student, Teacher, etc.)
  • Enrollment Status (Active, Inactive)
  • Enrolled Date
  • Dropped Date (if applicable)
  • Due Date (if applicable)


c. Demographic Data

  • Gender
  • Race (if applicable)
  • Date of Birth


d. Address and Contact Information

  • Street Address (Line 1 & Line 2)
  • City, State, ZIP Code
  • Email Address
  • Mobile Phone
  • Phone Number (optional)


e. Parent Login and Contact Information


  • First Name & Last Name
  • Email
  • Username (Auto-generated: <student username>-parent)
  • Password (Default: <student username>)
  • Status (Active/Inactive)
  • Mobile Number (optional)


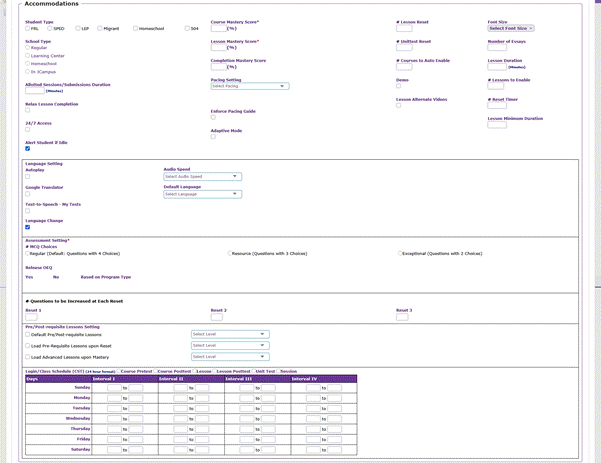
f. Pacing & Other Accommodations

  • Student Type
  • School Type
  • Mastery Score
  • No. of Resets
  • Language Setting
  • Assessment Setting
  • Class Schedule


Program Types

  • Program types are determined by the district and define the type of coursework a student is enrolled in. The two primary program types in GR LearnPro are Credit Accrual and Credit Recovery.


        1. Credit Accrual


  • Designed for students taking a course for the first time.
  • Students are required to complete all lessons and activities before advancing.
  • Course Pretests are usually turned off or used to assess a student's level at the beginning of a course, as students must complete the full coursework.
  • Ideal for students working toward graduation requirements or elective credits.


        2. Credit Recovery


  • Intended for students who failed a course and need to retake it to earn credit.
  • Includes pretests that assess prior knowledge and may exempt students from relearning mastered concepts.
  • Focuses on targeted learning by allowing students to bypass sections they have already mastered.
  • Ideal for students needing to recover lost credits and stay on track for graduation.


Enrolling a Student in Courses and Activities

  • Students are enrolled in courses based on school settings/contracts. By default, all activities enabled by the school will be applied to the student’s profile. 

        1. Course Enrollment Details

  • Select Course(s): Choose from available subjects.
  • Term Selection: Assign a specific term duration. By default, the current term will be selected.
  • Class Assignment: Assign the student to a specific class.


Once all the details are ensured, click Add Student to finalize the account creation.


Tips

  • Register students in their respective school and grade with predefined pacing.
  • Assign students to multiple courses as per their learning needs.
  • Auto-generate parent accounts for easy tracking and communication.
  • Verify student details to ensure accuracy in school, grade, and course selection.
  • Ensure proper course settings by enabling/disabling lessons, posttests, and other activity features as per school/district policies.
  • Communicate parent login details to guardians for easy tracking of student progress.

Was this article helpful?

That’s Great!

Thank you for your feedback

Sorry! We couldn't be helpful

Thank you for your feedback

Let us know how can we improve this article!

Select at least one of the reasons
CAPTCHA verification is required.

Feedback sent

We appreciate your effort and will try to fix the article